How To Take A Soil Sample For Testing

Noel Garcia CCA • January 8, 2020

Proper Sampling Procedures and Things to Consider When Collecting a Soil Sample

soil profile

This Soil Profile Guide illustrates different soil depths for reference to plant roots zones.


Depths for collecting soil samples from  major root zones:

  • Lawns, Pastures and Turf should be 0 to 6 inches.                                                                                      
  • Field Crops and Garden Beds should be 0 to 12 inches.                                                                           
  • For deep-rooted plants and longer-term evaluations, take a subsoil sample from 12 to 24 inches. Do not combine samples from 0 to 12 inches depth with samples from 12 to 24 inch depth.                                                             
  • For Trees, collect a 4-foot soil profile and keep separate (0-12", 12-24", 24-36", 36-48")

Procuring a correctly sampled and handled soil is CRUCIAL to the accuracy of your soil test results!


Things to consider:


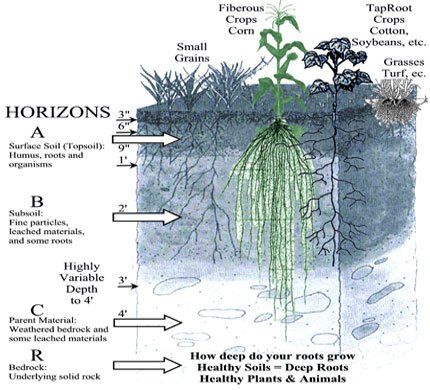
1) Soil samples must be taken directly from the major root zone of your problem area.


2) Soil tests can only reveal what is in the physical soil you send us, not the surrounding areas.


3) To avoid delays in processing your sample include a completed submittal lab form with you soil sample bag.


4) Making a map of your sample locations with a permanent identification systems will ensure future samples are taken from these same locations. Using a GPS and marking co-ordinates or using signs or markers is a great way to remember exact locations.


5) To make a representative composite soil sample you should collect soil from four locations throughout the specific area being tested, even for small beds or areas.


6) Only combine soils with no distinguishing differences or performance markers from over a specific area of interest. You can make one representative soil sample of up to 40 acres of non-irrigated land.


7) Take separate samples from areas where you see significant differences in plant quality, soil coloration or growth performance. Don't combine samples from different soil conditions into one sample.


8) For problem areas, confine the sample taken to the specific area such as the root zone around dying plants or heavily calcified or discolored soil.


 How To Take A Soil Sample


  1. With a spade, shovel, post hole digger or trowel, dig a hole from the top to the bottom of the desired area to sample. Put the excess soil to the side.
  2. Taking your spade, shovel or trowel, shave the wall of the hole at a thickness of one inch, from the top of the hole to the bottom.
  3. When digging your hole, if the soil is too dry or loose and crumbly, shave short lengths of constant width.
  4. Be sure to include the top crust of the soil in the sample. It contains fertilizer and elements which are a part of the overall soil profile.
  5. Remove trash, debris and foreign material such as branches, roots, stems, rocks, etc.
  6. The goal is to take a uniform slice of soil from the top of the top to the bottom of the sample area.
  7. Put the collected soil for each specific area in a plastic bucket and mix well.
  8. Break up large clumps and clods to achieve an even consistency.
  9. If the soil is wet, muddy, or contains moisture significant enough to damage packaging or hinder mailing, please allow time for the sample to dry before packing and shipping.
  10. Do not dry the sample by placing it in the sun or exposing it to heat.
  11. Allow the sample to dry naturally in a sunless area.
  12. Put enough soil in your return bag to fill to the line, about three to four cups. Fold the top of the bag down to the front once over, and wrap ties around the rear to keep the bag closed.
  13. A quart-sized Ziploc bag is also an acceptable sampling bag.
  14. Place your soil sample bag and completed submittal form into a shipping box.
  15. Do not place your submittal form in the sample bag with the soil.
  16. Be sure to clearly mark the sample bag with your sample ID.
  17. Use packing to prevent the bag(s) from moving around in the shipping box.
  18. You are now ready to ship your sample with your preferred mail carrier to 4915 West Monte Cristo Rd., Edinburg, TX 78541.


NOTE: Test frequently. Test after each crop for optimum management. Perform interim tests for sudden changes or specific areas of poor performance. Problem areas can be isolated to specific areas and should be marked and tested regularly in conjunction with overall testing.


Please contact us at 956-383-0739 if you have any trouble or questions regarding sending in your soil sample.

TPS Lab's Blog

By Joe Pedroza May 5, 2025
Understanding the True Value Behind the Price Tag
By Joe Pedroza April 30, 2025
As summer sets in across much of the country, crops enter one of the most demanding phases of their life cycle. With increased heat, active fruiting, and water stress, nutrient uptake becomes more unpredictable. Even the most well-fertilized soils may fall short in delivering the right nutrients at the right time. That’s where mid-season plant tissue testing becomes an invaluable tool. Why Soil Tests Alone Aren’t Enough Soil tests provide a vital baseline before planting, helping you understand what's available in the root zone. But as the season progresses, multiple factors can interfere with nutrient uptake: Heat stress and limited moisture reduce nutrient movement in soil, making it harder for roots to access nutrients even when they're present. Soil pH shifts —common as microbial activity changes—can lock up nutrients like phosphorus, zinc, or iron, rendering them unavailable to plants. Plant demand changes rapidly during flowering and fruiting, meaning nutrient requirements evolve faster than soil reserves or slow-release fertilizers can respond. A mid-season tissue test reveals what the plant is actually absorbing, not just what’s in the soil. What Tissue Testing Tells You A tissue test provides a real-time snapshot of the plant’s nutritional status. It helps identify: Early signs of nutrient deficiencies , often before symptoms show up visually. This allows for preventative correction, rather than trying to fix a visible problem too late in the season. Imbalances between key nutrients , such as excess nitrogen suppressing calcium uptake, or low magnesium reducing potassium efficiency. Uptake issues caused by stress , poor irrigation practices, or compacted root zones—especially important in summer when evapotranspiration is high and root efficiency is lower. Tissue testing gives you the insight needed to make targeted nutritional corrections , optimizing fruit set, size, and quality. When and How to Tissue Test For most fruiting crops, ideal sampling windows include: Just before flowering , when nutrient demand is about to spike. Early fruit development , to support strong cell division and prevent blossom-end disorders. Mid-season (peak fruit load) , when nutrient draw is at its highest and deficiencies are most likely to develop. Select healthy, recently matured leaves from a representative section of the field. Avoid leaves with obvious damage, disease, or pest activity. Consistency in sampling location and leaf age is critical for accurate comparisons over time. At TPS Lab, we provide detailed sampling instructions and fast turnaround times, so you can act before yield is compromised. Common Summer Deficiencies to Watch For Even in fertilized fields, these nutrients often fall short under summer stress: Potassium (K): Crucial for water regulation, sugar transport, and fruit development. Deficiencies can cause uneven ripening, poor flavor, and lower yields. Calcium (Ca): Required for cell wall strength and fruit quality. Limited uptake often causes blossom end rot in tomatoes and peppers or tip burn in leafy greens. Magnesium (Mg): A central component of chlorophyll. Magnesium deficiency can lead to interveinal yellowing and poor photosynthesis, especially under intense sunlight. Micronutrients (Boron, Manganese, Zinc): These trace elements play vital roles in pollination, enzyme function, and hormone regulation. Even minor deficiencies can lead to poor fruit set or malformed growth. How to Act on Results Once your results are in, use them to tailor your in-season fertility program. Depending on the crop and severity, this might involve: Adjusting fertigation blends to include more soluble potassium or micronutrients based on test results. Applying foliar sprays for immediate correction, especially for mobile nutrients or in cases where soil uptake is impaired. Incorporating amino acid-based fertilizers or biostimulants to enhance nutrient absorption, increase stress tolerance, and promote balanced growth without risking burn or over-fertilization. TPS Lab consultants can help interpret your report and recommend specific products or strategies—whether that includes our own solutions like Nitro P9 or CSL+ , or broader categories suited to your operation. Stay Proactive, Not Reactive By integrating tissue testing into your summer crop management, you shift from guesswork to precision. Avoid late-season surprises, improve fruit quality, and maximize your ROI with simple mid-season monitoring.  Ready to test? Click here to submit a sample or call us at 956-383-0739 to speak with a consultant.
By Joe Pedroza April 17, 2025
And Stop Wasting Money on Products That Don’t Work
Show More